Jae's Blog

Changes in Posti’s data processing

If you live in Finland, you have without a doubt interacted with Posti. Recently, they announced large changes in their user data processing policies, taking into effect on May 20th 2025.

Bottom of the line is:

  • New targeted advertising (directly sending your data to Facebook, Google, Adform and many others)
  • Profiling of your data

To avoid getting caught in this, visit the account settings page (on my.account.posti.fi), then on the left, select “settings”.

In there you will need to uncheck two options:

  • “Use of customer data for targeted advertising (effective from 20 May)”
  • “Profiling (effective from 20 May)”

Also feel free to clean up any options you might have forgotten to disable before.

As a friendly reminder: do not forget to press “save changes” on the bottom of the page when done with the unchecking part.

With this, you should be pretty safe to proceed, tho just in case, I’d still watch this page just in case Posti has a magical bug that would re-enable everything for everyone.

Personally, I find this whole thing kinda scummy given Posti is an essential public service. Forcing that kind of analytics on people can only go badly on the long term.

Fedora 42 and new RSS reader

A few weeks ago, I finally did the final switched and completely nuked my Windows 11 install from my workstation.

The last thing that was keeping me on Windows, VR, is now pretty much painless on Linux. All of this thanks to the guides provided by Linux VR Adventures, and most particularly, the software Envision which allows you to set up and start everything is a very painless way.

As I mentioned multiple times in the past, my distro of choice is Fedora, given it’s really easy to install, use and maintain.

This week we also had some great news, a new Fedora version, 42 which brought on a bunch of cool stuff.

As expected the upgrade was painless, and now my workstation is shinier than ever (just ignore my awful PC building skills and the fact that some USB ports might be fried by now).

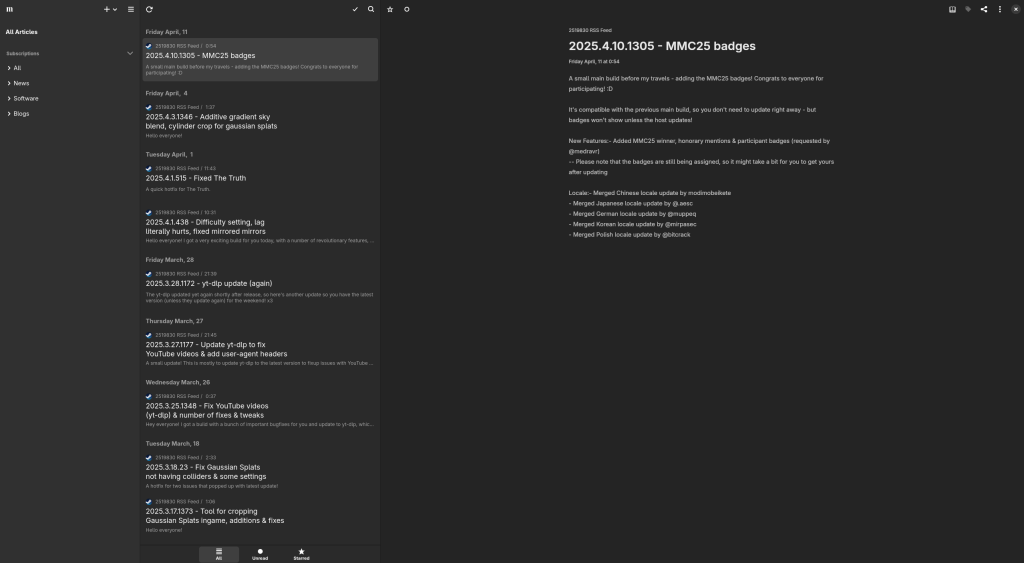
I also switched RSS readers and now using NewsFlash in combination with MiniFlux.

So far the setup has worked quite well, and I can access all my feeds on all my devices without having to copy config files around which is a big win by my books.

Moar blog stuff

Hey everybody!

Small update about this blog in particular.
As you may have noticed, the style has changed quite a lot and there are now categories on the right side of the page.

I’ve decided to make it easier for me to maintain this blog and write more in general, which was why I originally moved to Mataroa (but then left because of the lack of IPv6 support).

Since switching back to Hugo, writing stuff has been a bit offputting because it requires me to run stuff locally, managing drafts can be a bit of a hassle, especially when talking about really quick ideas.

So, now that my blog edition is more streamlined, expect more posts in the future!
Fear not, no links were broken in the migration, I made sure to add redirects everywhere.

Don’t forget to update the RSS URL in your favourite reader to https://b.j4.lc/feed/ instead.
The previous one should still work, and redirect, but it’s better to have the correct one.

Adding this afterwards, sorry if I accidentally spammed your RSS reader, I totally forgot to make sure posts wouldn’t be duplicated D:

Free spell checking

You probably know about Grammarly and other web browser add-ons that basically act as fancier spell checkers.
They’re expensive, a bit opaque, and you can’t really integrate them into whatever you want.

Well today, I’ll talk about LanguageTool. Despite offering full-blown plans, what is little known is that you can use it locally and host your own spell checker for free!

Setting this up

I personally use Fedora Linux, so this tutorial will assume you have a similar setup. This particular one should work for any Systemd-enabled distribution.

First, you’ll need to download the latest LanguageTool HTTP server snapshot from their mirror which should be in the form of a zip file, then unzip it which should leave you with a file named something like LanguageTool-6.6-SNAPSHOT (replace the 6.6-SNAPSHOT by the version you downloaded).

For simplicity’s sake, let’s rename LanguageTool-6.6-SNAPSHOT into languagetool and move it to our own folder with:

mv LanguageTool-6.6-SNAPSHOT languagetool
mv languagetool ~Code language: Bash (bash)

You can also go in that directory using cd ~/languagetool and type pwd to get the full path to there, we’ll need it a bit later.

Now, time to create a systemd service to start it automatically. First, we’re gonna have to create the folder ~/.config/systemd/user/ using mkdir -p ~/.config/systemd/user/.

Once this is done, you can then edit the languagetool.service file using your favourite editor, in my case, Sublime Text: subl ~/.config/systemd/user/languagetool.service.

In there, you can put the following sample service file, feel free to tweak it accordingly to your needs, but this should be good for most use cases (replace jae by your user):

[Unit]
Description=LanguageTool server
After=graphical.target

[Service]
WorkingDirectory=/home/jae/languagetool
ExecStart=java -cp languagetool-server.jar org.languagetool.server.HTTPServer --config server.properties --port 8081 --allow-origin

[Install]
WantedBy=default.target
Code language: JavaScript (javascript)

Before, anything, go in the ~/languagetool directory and create the server.properties file by using: touch ~/languagetool/server.properties.

Now time to start and enable the service:

systemctl --user start languagetool
systemctl --user enable languagetoolCode language: Bash (bash)

And there you go, your local LanguageTool server will be started automatically when you log into your session.

Now you, as a finishing touch, you can install the Firefox add-on, and once install, go in the settings, scroll all the way at the bottom, click on the “advanced settings” tab, and swap the “LanguageTool server” option to “local server”.

Congratulations, you now have an amazing spell checker in your browser for 100% free.

If you’re curious about how exactly that stuff works, you can see the full LanguageTool source on GitHub.

If you are a developer, check out their API docs to build stuff around it.

Making your own web corner

So, you’ve finally bought yourself a domain (or thinking about it), got a server at home, and now you want to host your own corner of the web?

Great! Allow me to be your guide through this journey.

Pre-requisites

You’ll need a bunch of stuff for this tutorial, including:

A domain

Your domain will be the public face and how people (and yourself) will access your corner, choose it wisely.

To get a domain, you need to choose a registrar first, to which you will register it. Registering a domain can cost a fee anywhere from 5€ to 5000€.

Some good registrars include:

  • Spaceship – Really cheap, you can get a .eu for just under 5€ there
  • Hetzner – Well-known hosting service & DNS registrar
  • PorkBun – Well-known, huge selection, cheap sometimes
  • Inwx – German registrar, good service

If your friends also have their own corners, ask them about their registrar, maybe they had good experiences with some others than listed here!

From now on, assume we just bought example.com as a domain. Of course, replace this example.com by the domain you just got in the next steps.

A server

Now here comes the part where you have to choose where your stuff will be hosted. There are multiple ways of doing this:

  • Run a spare computer at home (this tutorial will focus on this)
  • Use a hosting provider like Hetzner or Infomaniak (similar to the first option, so this tutorial also applies)
  • Use GitLab, GitHub or Codeberg pages to host a static website (not covered in this tutorial, coming soon!)

In this example, we assume you have a spare computer at home running Debian Linux.

The boring networking part

DNS stands for Domain Name System. You can read more about it on howdns.works, but the basic gist is:

  • IP addresses are hard for people to remember as-is
  • DNS puts in relation a domain name to an IP address
  • For instance: j4.lc will point to 2a12:4946:9900:f00::f00 when being looked up
  • There are a lot of DNS record types, but the most importants are A and AAAA here
  • A A record maps a domain name to an IPv4 address, for instance: j4.lc -> 95.217.179.88
  • A AAAA record maps a domain name to an IPv6 address, for instance: j4.lc -> 2a12:4946:9900:f00::f00

Pointing your domain to your server

First, let’s figure out what’s the public IP of your server. For this you can execute:

curl -4 ifconfig.me
curl -6 ifconfig.meCode language: Bash (bash)

If the second command fails, this means your ISP doesn’t supports IPv6. In any case, write those IPs down in a notepad and let’s move on.

You will then need to add a DNS record on your domain to point to your server. To do this, log onto your registar and direct yourself to the DNS control panel.

When adding a record, you will have a few properties to fill:

  • name – Which subdomain you want to use. Setting this to @ will mean the root of the domain, in our case example.com, setting this to anything else, for instance awoo will “create” the subdomain awoo.example.com and make it point to your IP instead of the root
  • type – We’ve seen this earlier, we want this to be A or AAAA depending of if we’re adding an IPv4 or IPv6 (both can be present at the same time)
  • ttl – This is the time (in seconds) the record will stay cached. Leave it as-is. This is how long you will have to wait when you do a change to this record for you to see it
  • data – The IP address you want the record to point to
  • proxy status – This is for CloudFlare only, this setting controls if we want our site to be through CloudFlare, let’s disable this for now

Note: you do not need to specify the port of your application in the record. It is up to the app you are using (for instance, a web browser) to query the right ports. Adding a record to 95.217.179.88:8080 will be invalid for instance.

In our example, we can set everything (once again replace with your own data):

  • Name: @
  • Type: AAAA
  • TTL: 60 (default)
  • Data: 2a12:4946:9900:f00::f00

Meaning our root domain example.com will resolve to 2a12:4946:9900:f00::f00.

We can also add a A record to provide IPv4 connectivity:

  • Name: @
  • Type: A
  • TTL: 60 (default)
  • Data: 95.217.179.88

Opening ports

Now that your domain is pointing to your home server, you will need to open a few ports to make it accessible from the outside.

First, here are the list of ports you need:

  • 80 is the default HTTP port that you will need to later to obtain SSL certificates
  • 443 is the default HTTPS port that you will need to serve your corner

You will then need to allow those two ports in two places:

  • Your OS firewall, can be done through ufw usually
  • Your router’s settings (also called “port opening”, “port redirection” and a lot of other names), make sure the two ports are open on both TCP and UDP and pointing to your home server

Warning: in some countries, some ISPs will not allow you to open those two ports. It’s probably because you are behind something called CGNAT which allows ISPs to share the same IP address between multiple customers.
If this is the case call your ISP to get a proper IP that is not behind CGNAT. If this is not possible, you will have to either rent a server at a hosting provider, or get a tunnel.

Once this is done, congratulations, the external world can now reach you.

Web server shenanigans

Now, to serve your corner to the external world, you will need a web server. In this case, we will use Caddy which is really easy to use and takes care of HTTPS renewals for you.

Installing a web server

First, we’re gonna need to install Caddy, it goes a bit like this:

sudo apt install -y debian-keyring debian-archive-keyring apt-transport-https curl
curl -1sLf 'https://dl.cloudsmith.io/public/caddy/stable/gpg.key' | sudo gpg --dearmor -o /usr/share/keyrings/caddy-stable-archive-keyring.gpg
curl -1sLf 'https://dl.cloudsmith.io/public/caddy/stable/debian.deb.txt' | sudo tee /etc/apt/sources.list.d/caddy-stable.list
sudo apt update
sudo apt install caddyCode language: Bash (bash)

After doing this, make sure Caddy is started and enabled (meaning it will start with the server) by doing:

sudo systemctl start caddy sudo systemctl enable caddy

Now, if you visit your domain, you will see the example Caddy page, meaning you are now online!

Editing the web server configuration

The configuration for Caddy is located at /etc/caddy/Caddyfile. You can see basic examples of it on the Caddy documentation website.

In our example, we’re gonna use the following simple configuration (as always, replace example.com by your domain):

https://example.com {
    root * /var/www/corner
    file_server
}
Code language: JavaScript (javascript)

Now, create the directory /var/www/corner and add your website files in there, for instance an index.html.

Restart Caddy using sudo systemctl restart caddy, wait a minute for the HTTPS certificate to be issued and you’re in business, you now have your own corner on the internet!

Have fun editing it and sharing it to your friends.
A blog post will be published later this month on how to create your own blog (for free) using GitLab pages!

Reading more

Here are some links to help you get started with your newfound internet home:

If you feel like I missed something, please do contact me and I will add it there.

Resostats outage postmortem

Today, from approximately 16:30 UTC to 17:45 UTC, the Resostats Dashboard which provides various public metrics on Resonite was offline.

Background

Routine maintenance was being done on the machine hosting Resostats, namely updating the packages, containers, cleaning up some debugging tools.
Configuration changes were committed to try and have the TSDB sync faster to the S3 storage bucket that backs the whole instance.

Metrics stored on the Mimir instances do not have any set expiration.

The S3 bucket itself is fully replicated and backed up using Restic in multiple places, including rsync.net as an external one.

The cause

While committing changes to the mimir configuration, the compactor_blocks_retention_period configuration key was swapped from 0 to 12h.

The compactor_blocks_retention_period configuration key in mimir specifies the retention period for blocks. Anything older than the set amount will get marked for deletion, then cleaned up.
You can read more about this in the official mimir configuration documentation.

This prompted the mimir instances to start marking blocks older than 12h for deletion, thus cleaning inadvertently years of historical data.

Restoration

The error in the configuration was quickly spotted and corrected, but the blocks already marked for deletion were already being cleaned up regardless.
Given the backup hosted on rsync.net was the closest and fastest for this available server, the decision was taken to restore everything from there.

The restoration process was easy enough, given Restic provides a nice command for this:

$ restic  --password-file=/sec/pass -r sftp:user@user.rsync.net:bck/st-fi/mimir-blocks restore latest --target /srv/pool/mimir-blocksCode language: Bash (bash)

Most of the time spent was the stressful wait for the backup to be downloaded onto the machine.

In the end, about 12h of metrics were lost, which is not that much considering the scale of the outage.

Learnings

From now on, a backup will be done before starting any maintenance.
The current backup strategy has also been proven robust enough to withstand an event like this one.

Turns out having a proper backup strategy is damn effective.

My Signal config & switching to it

A few months ago, I started using Signal again. The messenger evolved quite a lot since I last used it, for instance, usernames weren’t even a thing back then, and this is mainly what drove me out of the platform.

But now that we have them, I feel a bit safer using it, knowing people don’t need my direct phone number to add me anymore. As a bonus, it’s now possible to import extended chat history when linking a desktop app, which is quite nice.

If you don’t know what Signal is, it’s quite simple: it’s an encrypted chat app. As it stands, it’s also the safest (broad sense there, please don’t hurt me) option at the moment as it has the most eyeballs on it and sane encryption. Soatok talks about that quite often on his blog as well.

Because I have no imagination whatsoever, here is how I use Signal (basically, the configuration keys I use for it in the “Privacy” section, please note that this is basically for the iOS version, no clue if the Android one has the same configuration keys).

Privacy

Phone number:

  • Who can see my phone number: nobody
  • Who can find me by number: nobody

Advanced:

  • Always relay calls: on

General:

  • Read receipts: off
  • Typing indicators: off
  • Disappearing messages: 4w
  • Hide screen in app switcher: on
  • Screen lock: on
  • Lock screen timeout: 5 minutes
  • Show calls in recent: off

Chats

General:

  • Generate links previews: off
  • Share contacts with iOS: off
  • Use phone contacts photos: off

Stories

General:

  • Turn off stories

Data usage

General:

  • Sent media quality: high

Coinciding with this post, I turned off the ability for new people to DM me on Telegram, from now on, personal contacts will have to be done through Signal.

If we have an existing DM and you want to switch to Signal, use that DM thread to ask me for my username. Otherwise, either email me yours or ping me on a common chat platform. Remember, none of us have to know each other’s phone number anymore, just setup a username if you haven’t already.

Making Bread

I recently got myself a bread maker. While I used to make the bread myself, the bread maker makes it even easier given I can just throw the ingredients in and forget about it. Since I got it, that poor thing has been running at least once a day (yes, I eat a lot of bread).

My go-to recipe is generally:

  1. Add 236mL of water in the pot
  2. Add 1.5 teaspoons of salt
  3. Add 2 tablespoons of sugar
  4. Add 2 tablespoons of oil
  5. Add 405g of flour
  6. Add 2 teaspoons of yeast
  7. Set the program on “sandwich bread” (should be a 3h one)
  8. There ya go

Pretty easy, right? The machine will knead, let it raise, then bake the bread all by itself, just don’t forget to let it cool for around an hour after it’s finished.

Right now, I got a Point POBM400GS bread machine, but I wonder if I could modify it to add a small webcam and some simple thing that would just return how much time is left before the bread is ready.

Hell, bread machines seem so simple that we could probably even make an Open-Source one.

Watch out for the bread Grafana dashboard.

Using the new GitHub ARM runners

Just yesterday at the time of writing, GitHub (finally) released their public ARM runners for Open-Source projects.

This means you can now build ARM programs natively on Linux without having to fiddle with weird cross-compilation.

One way to achieve that is through a Matrix. Considering the following workflow to build, then upload an artifact (taken from the YDMS Opus workflow I wrote):

on: [push]

jobs:
  Build-Linux:
    name: Builds Opus for Linux
    runs-on: ubuntu-latest
    steps:
      - uses: actions/checkout@v4

      - name: Download models
        run: ./autogen.sh

      - name: Create build directory
        run: mkdir build

      - name: Create build out variable
        id: buildoutput
        run: echo "build-output-dir=${{ github.workspace }}/build" >> "$GITHUB_OUTPUT"

      - name: Configure CMake
        working-directory: ${{ steps.buildoutput.outputs.build-output-dir }}
        run: cmake .. -DBUILD_SHARED_LIBS=ON

      - name: Build Opus for Linux
        working-directory: ${{ steps.buildoutput.outputs.build-output-dir }}
        run: cmake --build . --config Release --target package

      - name: Upload artifacts
        uses: actions/upload-artifact@v4
        with:
          name: opus-linux
          path: ${{ steps.buildoutput.outputs.build-output-dir }}/**/*.so
Code language: YAML (yaml)

We can now easily make it build for ARM by using a matrix referencing the new ubuntu-24.04-arm runner label.

For instance, we can add this before the job steps:

    strategy:
      matrix:
        osver: [ubuntu-latest, ubuntu-24.04-arm]
Code language: YAML (yaml)

Then change the runs-on configuration to specify ${{ matrix.osver }} which will create jobs for all the OS versions specified in the matrix.

One issue that might then arise is a name conflict when uploading the job artifacts. For instance, if our old Linux build uses:

      - name: Upload artifacts
        uses: actions/upload-artifact@v4
        with:
          name: opus-linux
          path: ${{ steps.buildoutput.outputs.build-output-dir }}/**/*.so
Code language: YAML (yaml)

And the same step is used by the ARM workflow, we will get an error that the artifact matching the name opus-linux already exists for this workflow run.

This is where a small conditional step can be added to set an environment variable with the desired name:

      - name: Set dist name
        run: |
          if ${{ matrix.osver == 'ubuntu-24.04-arm' }}; then
            echo "distname=opus-linux-arm" >> "$GITHUB_ENV"
          else
            echo "distname=opus-linux" >> "$GITHUB_ENV"
          fi
Code language: YAML (yaml)

We can then change our artifact upload step to use these new names:

      - name: Upload artifacts
        uses: actions/upload-artifact@v4
        with:
          name: ${{ env.distname }}
          path: ${{ steps.buildoutput.outputs.build-output-dir }}/**/*.so
Code language: YAML (yaml)

As a bit of a sidetrack, you can also use checks like this to conditionally skip (or execute) steps depending on the architecture, using a if statement:

      - name: Mystep
        uses: actions/myaction@v4
        if: ${{ matrix.osver != 'ubuntu-24.04-arm' }}
        steps: |
          echo Hello world
Code language: YAML (yaml)

In the end, it’s good that this GitHub feature finally landed. Before that, you had to use “large” runners which can cost quite a bit in the end.

Building .NET using GitLab CI/CD

As I often mention, I use .NET a lot in general, as it’s fairly easy to use, has a huge ecosystem, and has evolved really positively in the past years (long gone are the days of Mono :D).

Another component of this is that .NET projects are incredibly easy to build and publish using GitLab CI/CD.
Today, we’re gonna explore some ways of building and publishing a .NET project using just that.

Docker

Probably the most straightforward, considering a simple Dockerfile:

FROM mcr.microsoft.com/dotnet/sdk:9.0 AS build
COPY . ./builddir
WORKDIR /builddir/

ARG ARCH=linux-x64

RUN dotnet publish --runtime ${ARCH} --self-contained -o output

FROM mcr.microsoft.com/dotnet/runtime:9.0

WORKDIR /app
COPY --from=build /builddir/output .

RUN apt-get update && apt-get install -y --no-install-recommends \
    curl \
    && rm -rf /var/lib/apt/lists/*

HEALTHCHECK CMD ["curl", "--insecure", "--fail", "--silent", "--show-error", "http://127.0.0.1:8080"]

ENTRYPOINT ["dotnet", "MyApp.dll"]

Code language: YAML (yaml)

Note: this assumes your app builds to MyApp.dll and has a healtheck endpoint on http://127.0.0.1:8080

Then building the container image itself is really easy:

stages:
  - docker

variables:
  DOCKER_DIND_IMAGE: "docker:24.0.7-dind"

build:docker:
  stage: docker
  services:
    - "$DOCKER_DIND_IMAGE"
  image: "$DOCKER_DIND_IMAGE"
  before_script:
    - docker login -u "$CI_REGISTRY_USER" -p "$CI_REGISTRY_PASSWORD" "$CI_REGISTRY"
  script:
    - docker buildx create --use
    - docker buildx build
      --platform linux/amd64
      --file Dockerfile
      --tag "$CI_REGISTRY_IMAGE:${CI_COMMIT_REF_NAME%+*}"
      --provenance=false
      --push
      .
    - docker buildx rm
  only:
    - branches
    - tags
Code language: YAML (yaml)

This will build, then publish the image to the GitLab container registry of the repo. It’s possible to also specify a different registry, but kinda useless as the default one is already excellent for most cases.

Regular build / NuGet build

This type of build just requires source itself without much additional configuration.

It will build the software, then either upload the resulting files as an artifact or publish it into the GitLab NuGet registry.

For those two, I can recommend setting up a cache policy like:

cache:
  key: "$CI_JOB_STAGE-$CI_COMMIT_REF_SLUG"
  paths:
    - '$SOURCE_CODE_PATH$OBJECTS_DIRECTORY/project.assets.json'
    - '$SOURCE_CODE_PATH$OBJECTS_DIRECTORY/*.csproj.nuget.*'
    - '$NUGET_PACKAGES_DIRECTORY'
  policy: pull-push
Code language: YAML (yaml)

And a small restore snippet:

.restore_nuget:
  before_script:
    - 'dotnet restore --packages $NUGET_PACKAGES_DIRECTORY'
Code language: YAML (yaml)

You can also directly specify the build image that you want to use at the top of the CI definition file with, for instance:

image: mcr.microsoft.com/dotnet/sdk:9.0
Code language: YAML (yaml)

The regular build with artifact upload is also really easy:

build:
  extends: .restore_nuget
  stage: build
  script:
    - 'dotnet publish --no-restore'
  artifacts:
    paths:
      - MyApp/bin/Release/**/MyApp.dll
Code language: YAML (yaml)

In this case, we use ** to avoid having to update the path every time we upgrade the .NET version (for instance, .NET 8 will put the build in the net8.0 directory, .NET 9 in net9.0, etc).

Now, we can also build and publish the solution to the NuGet registry:

deploy:
  stage: deploy
  only: 
    - tags
  script:
    - dotnet pack -c Release
    - dotnet nuget add source "${CI_API_V4_URL}/projects/${CI_PROJECT_ID}/packages/nuget/index.json" --name gitlab --username gitlab-ci-token --password $CI_JOB_TOKEN --store-password-in-clear-text
    - dotnet nuget push "MyApp/bin/Release/*.nupkg" --source gitlab
  environment: $DEPLOY_ENVIRONMENT
Code language: YAML (yaml)

As seen in this definition, this publish stage will only run on tag pushes, but it’s also possible to generate a version string with the current commit and pushing this as a nightly release.

As an additional step, but not really related to the build itself, I often activate the Secret, SAST and dependencies scanning as it can prevent really obvious mistakes. Doing so is also really trivial:

include:
  - template: Jobs/Secret-Detection.gitlab-ci.yml
  - template: Security/SAST.gitlab-ci.yml
  - template: Security/Dependency-Scanning.gitlab-ci.yml
Code language: YAML (yaml)

In the end, building .NET is extremely trivial.

Newer Posts · Older Posts
Jae 2012-2025, CC BY-SA 4.0 unless stated otherwise.